Milford Memorial Library
  • Home
  • Search Our Catalog
  • Free Downloadable eBooks, Audiobooks, and Streaming Video
  • About Us
    • Library History
    • Library Policies
    • Employment Opportunities
  • Library Staff
  • Library Board of Trustees
    • Board Member Application
    • Library Board Agendas
    • Library Board Minutes
  • Use Our Library
    • Youth
    • Young Adults
    • Adults
    • Students
    • Helpful Resources
  • Library News
    • Calendar of Events
    • Photo Gallery
  • Friends of the Milford Memorial Library
  • Volunteer at the Library
  • Tax Forms and Information
  • Suggest a Book
  • Unsubscribe
  • Blog
Follow us on Social Media

jelly bean rainbow

1/17/2023

 
Picture

​Video Link: https://www.youtube.com/watch?v=qAaNPIc8Ne8

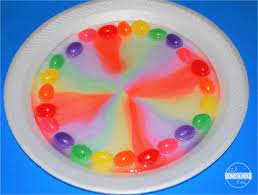
Supplies: Jelly Beans , cup of water, plate

INSTRUCTIONS
1. Place the jelly beans around the center of the plate.
2. Pour water until the bottom of the plate is covered with water
3. Watch as the colors start to spread and cover the inside of the plate.


the floating M

1/6/2023

 
Picture
​Video Link
​:https://www.youtube.com/watch?v=jWR8oCZ1rN8
 
Supplies: M&Ms, cup/ bowl, water
 
INSTRUCTIONS
1. Fill a cup or bowl half full of water
2. Place some M&Ms into the cup/bowl of water
3. Wait until the M&Ms start to dissolve and then watch the Ms start to float.


Edible Peeps Playdough

1/6/2023

 
Picture
Video Link:
https://kidsactivitiesblog.com/51416/candy-play-dough/

Supplies
3 Peeps – one color works best
1 Tablespoon of Coconut Oil  3 Tablespoons of Powdered Sugar (and some more for dusting)
Microwave,  Bowl, Metal Spoon or stick for stirring
INSTRUCTIONS1. Place the Peeps and coconut oil in a microwave safe bowl and microwave for 10 second intervals until the candy Peeps "grow" with heat.

2. Add powdered sugar and stir until it starts pulling away from the bowl's edge.
Dust hands with powdered sugar and knead out any more lumps.
Note: Add powdered sugar if the dough is too sticky. Add more oil if it starts to crack.
How to Store Peeps Playdough
​
You can play with the marshmallow play dough as normal play dough, but it does not store well. Will harden great for carving and cutting but not as playdough.


Infinity Stone Keychain or Necklace

4/7/2022

 
Picture
Link: https://asthebunnyhops.com/infinity-stone-necklace/
 
Supplies:
Key ring, Head Pins, 6 stones—1 of each (orange, green, dark red, red, yellow, blue)
 
Instructions
1. Put the beads onto the head pin. They can be in any order you would like.
2. Use pliers to bend the head pin at the top of the crystals. Use wire snips to trim off any extra length on the head pin.
3. Use the pliers to create a loop at the top of the head pin. Slide it on to the keychain  or if you have a chain , you can make it into a necklace.


Easy DIY TEsseract

4/7/2022

 
Picture
Video Link:
https://www.youtube.com/watch?v=78unLW8WkAY
​
Supplies: Cardstock, tissue paper, magnet strips, glue, blue light, tape, watch battery, and scissors
​


​
Instructions
1. Cut out 7 squares out of the cardstock and then cut out the center of each of the squares.
2. Cut magnets and glue onto 2 of the squares.  You will only need one right away and the other will be at the end.
3. Glue one an edge of the magnetic squares with an edge of another square. Repeat this process to until you have a square built.  Make sure to keep the magnetic side on the outside.
4. Then glue a square to the bottom of the cube.You will end up with a 6-sided cube with the magnets on the outside
5. Make sure to leave the magnetic side open. You will take a piece of white tissue paper that is wider then the cube glue one edge down to a square and then wrap it around tightly, but not tight enough that it will rip. Once wrapped around glue the end piece to the beginning piece. Cut off the excess on the sides.
6. You will cut a square piece of tissue paper and glue to the opening that is NOT magnetic and then trim off the excess.
7. Cover the last remaining magnetic square with the white tissue paper and cut off excess.
8. For the inside crinkle some white tissue paper. Then flatten the tissue paper out to put in the blue light and wrap it up.
9. Tape your light bulb onto the battery. the light into it. You will have to test to sePlace it into the open side of the cube.                                                                                  
10. Then place the magnetic top on top of it.


DIY Phone Amplifier and Stand

4/7/2022

 
Picture
Supplies:
Toilet paper roll/ a paper towel roll cut down to size
2 paper or plastic cups, Scissors, Knife
 
Source:
​https://www.muminthemadhouse.com/diy-phone-amplifier-and-stand/
 
Instructions
1. Take your phone and trace around the bottom on the toilet roll.  If you have a larger phone or want to do this for a tablet then you could use a kitchen roll tube.  Cut out the slot.  We found it easier to make the initial cut with the craft knife before using scissors.
2. Trace end of the toilet roll on the lower side of each cup. Again we found it easier to make the initial cuts with the craft knife before using a small pair of scissors.  Do the same with the other cup.
3. Decorate how you would like
4. Once you have decorated your tube and cups, slot your tube into the cups and et voila!
 

Scratch Cd Clock

4/7/2022

 
Supplies:
CD, Paint, paint brush, paper clip, double sided tape, clock mechanism, pencil, protractor
 
Video: https://www.youtube.com/watch?v=RuB9xwTEV0Y
 
Instructions:
1. Paint the black paint onto shiny side and let dry. Repeat if needed
2. Using a pencil and the protractor, figure where your clock numbers go.
​               This video may help. https://www.youtube.com/watch?v=ZWaTX7bse_M
3.  Design the rest of your clock face.
4. Using the paper clip, start scratching your design. Yes, the paint should be coming off.
5. Once done and the cd is cleaned off. Start assembling the clock mechanism to the cd.
6. Then display

DIY Paper Football Game

2/17/2022


Card Games

2/17/2022


How to play Mancala

2/17/2022

 
​Supplies: 2 players, Mancala board with 48 Stones
Video: https://www.youtube.com/watch?v=2T0jeY-BxU4&t=1s
 
Setup The board is placed between the two players, and four stones are placed in each cup. Each player only plays from the 6 cups directly in front of him/her. The large cups at the ends of the board are the Mancalas. Each player's own Mancala is to the right. The stones only move counterclockwise to the right. 
Objective The object of the game is to get more stones in your Mancala than your opponent gets in his/her Mancala. 
Game Play The stones from a cup are picked up, and one stone is placed in each cup, starting to the right. If the last stone played ends in your Mancala, you move again.If a player’s last stone ends in an empty cup on his/her own side, the stones from the opposite side are captured. The capturing stone and the captured stones on the opposite side all go to the player’s Mancala.
When a player has removed all the stones from his/her side, the game is over. Any stones that are in cups on the other side are moved to that player’s Mancala.
 
Scoring The stones in each Mancala are counted. The player with more stones wins the game.Rule A player only plays stones into his/her own Mancala.

How to make a Mancala BoardSupplies: egg carton, a small container, and 48 little pieces of cut paper of any type
Instructions:1. Separate the lid and the bottom of the egg carton. Like the first image2. The small container will be used for your  mancala3.  The little pieces of paper will be your stones 
<<Previous
Forward>>

    Author

    Milford Library Staff

    Archives

    February 2023
    January 2023
    April 2022
    February 2022
    November 2021
    June 2018
    March 2018
    May 2017
    March 2017
    January 2017
    June 2016
    November 2015
    October 2015
    September 2015
    July 2015
    June 2015
    May 2015
    April 2015
    March 2015
    February 2015
    January 2015
    December 2014
    November 2014
    October 2014
    September 2014
    June 2013
    February 2013

    RSS Feed

Powered by Create your own unique website with customizable templates.