Milford Memorial Library
  • Home
  • Search Our Catalog
  • Free Downloadable eBooks, Audiobooks, and Streaming Video
  • About Us
    • Library History
    • Library Policies
    • Employment Opportunities
  • Library Staff
  • Library Board of Trustees
    • Board Member Application
    • Library Board Agendas
    • Library Board Minutes
  • Use Our Library
    • Youth
    • Young Adults
    • Adults
    • Students
    • Helpful Resources
  • Library News
    • Calendar of Events
    • Photo Gallery
  • Friends of the Milford Memorial Library
  • Volunteer at the Library
  • Tax Forms and Information
  • Suggest a Book
  • Unsubscribe
  • Blog
Follow us on Social Media

Infinity Stone Keychain or Necklace

4/7/2022

 
Picture
Link: https://asthebunnyhops.com/infinity-stone-necklace/
 
Supplies:
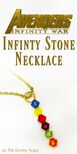
Key ring, Head Pins, 6 stones—1 of each (orange, green, dark red, red, yellow, blue)
 
Instructions
1. Put the beads onto the head pin. They can be in any order you would like.
2. Use pliers to bend the head pin at the top of the crystals. Use wire snips to trim off any extra length on the head pin.
3. Use the pliers to create a loop at the top of the head pin. Slide it on to the keychain  or if you have a chain , you can make it into a necklace.


Easy DIY TEsseract

4/7/2022

 
Picture
Video Link:
https://www.youtube.com/watch?v=78unLW8WkAY
​
Supplies: Cardstock, tissue paper, magnet strips, glue, blue light, tape, watch battery, and scissors
​


​
Instructions
1. Cut out 7 squares out of the cardstock and then cut out the center of each of the squares.
2. Cut magnets and glue onto 2 of the squares.  You will only need one right away and the other will be at the end.
3. Glue one an edge of the magnetic squares with an edge of another square. Repeat this process to until you have a square built.  Make sure to keep the magnetic side on the outside.
4. Then glue a square to the bottom of the cube.You will end up with a 6-sided cube with the magnets on the outside
5. Make sure to leave the magnetic side open. You will take a piece of white tissue paper that is wider then the cube glue one edge down to a square and then wrap it around tightly, but not tight enough that it will rip. Once wrapped around glue the end piece to the beginning piece. Cut off the excess on the sides.
6. You will cut a square piece of tissue paper and glue to the opening that is NOT magnetic and then trim off the excess.
7. Cover the last remaining magnetic square with the white tissue paper and cut off excess.
8. For the inside crinkle some white tissue paper. Then flatten the tissue paper out to put in the blue light and wrap it up.
9. Tape your light bulb onto the battery. the light into it. You will have to test to sePlace it into the open side of the cube.                                                                                  
10. Then place the magnetic top on top of it.


DIY Phone Amplifier and Stand

4/7/2022

 
Picture
Supplies:
Toilet paper roll/ a paper towel roll cut down to size
2 paper or plastic cups, Scissors, Knife
 
Source:
​https://www.muminthemadhouse.com/diy-phone-amplifier-and-stand/
 
Instructions
1. Take your phone and trace around the bottom on the toilet roll.  If you have a larger phone or want to do this for a tablet then you could use a kitchen roll tube.  Cut out the slot.  We found it easier to make the initial cut with the craft knife before using scissors.
2. Trace end of the toilet roll on the lower side of each cup. Again we found it easier to make the initial cuts with the craft knife before using a small pair of scissors.  Do the same with the other cup.
3. Decorate how you would like
4. Once you have decorated your tube and cups, slot your tube into the cups and et voila!
 

Scratch Cd Clock

4/7/2022

 
Supplies:
CD, Paint, paint brush, paper clip, double sided tape, clock mechanism, pencil, protractor
 
Video: https://www.youtube.com/watch?v=RuB9xwTEV0Y
 
Instructions:
1. Paint the black paint onto shiny side and let dry. Repeat if needed
2. Using a pencil and the protractor, figure where your clock numbers go.
​               This video may help. https://www.youtube.com/watch?v=ZWaTX7bse_M
3.  Design the rest of your clock face.
4. Using the paper clip, start scratching your design. Yes, the paint should be coming off.
5. Once done and the cd is cleaned off. Start assembling the clock mechanism to the cd.
6. Then display

    Author

    Milford Library Staff

    Archives

    January 2023
    April 2022
    February 2022
    November 2021
    June 2018
    March 2018
    May 2017
    March 2017
    January 2017
    June 2016
    November 2015
    October 2015
    September 2015
    July 2015
    June 2015
    May 2015
    April 2015
    March 2015
    February 2015
    January 2015
    December 2014
    November 2014
    October 2014
    September 2014
    June 2013
    February 2013

    RSS Feed

Powered by Create your own unique website with customizable templates.