Milford Memorial Library
  • Home
  • Search Our Catalog
  • Free Downloadable eBooks, Audiobooks, and Streaming Video
  • About Us
    • Library History
    • Library Policies
    • Employment Opportunities
  • Library Staff
  • Library Board of Trustees
    • Board Member Application
    • Library Board Agendas
    • Library Board Minutes
  • Use Our Library
    • Youth
    • Young Adults
    • Adults
    • Students
    • Helpful Resources
  • Library News
    • Calendar of Events
    • Photo Gallery
  • Friends of the Milford Memorial Library
  • Volunteer at the Library
  • Tax Forms and Information
  • Suggest a Book
  • Unsubscribe
  • Blog
Follow us on Social Media

Mountain Book Ends

11/23/2021

 
Picture


​

SUPPLIES: PAINT (BROWN), CUP, WATER, RAG, PAINT BRUSH, AND PAINT STIRER

GUIDE HELP: Start video at 1 min and 45 seconds for help 
https://www.youtube.com/watch?v=ui1I368Fa1Y


INSTRUCTION
1.  In your cup, mix your 1 tablespoon of paint with 2 tablespoons of water. Should look like  a chocolate milk consistency
2. Stir until there  are not any lumps of paint.
3. Going with the wood grain, paint on the brown wash stain. You can use your paint brush or rag for this. If you want more of the wood showing, take a paper towel or another rag to dab across your mountain.
           ** The paint will stain clothing and other clothes. Do not use anything you want to keep nice as a rag**
4. Let it dry, you may do another coat, if you think it needs it.


​
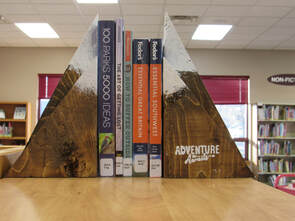
MOUNTIAN BOOKENDS: TRAIL 2

SUPPLIES

PAINT (WHITE), PAINT BRUSH , SPONGE, PAINTERS TAPE,  STENCIL, AND PENCIL

INSTRUCTION

1.  After the mountains have fully dried, pick a mountain to stencil.
2. Place your stencil in the middle of a mountain. Then with painter’s tape, tape it tightly into place.
3. With your white paint and sponge, dab paint until your stencil is covered. When dabbing, you may want to hold onto the stencil, to make sure it is extra tight and doesn’t move.
4. Once the stenciled area is covered, carefully, remove the stencil and tape.
5. After your mountains are completely dry, take the painter’s tape and jaggedly design your where your snowed cap peak will be. Make sure the tape is flat with the surface. Start painting with your brush and white paint.  Also if you want to free hand this with your paint brush you may as well.  Let dry, may have to have a couple of coats.
6. You will repeat this step for all the mountain peaks and make sure to paint the sides and back.

Click for GUIDE HELP and start at 1 minute and 45 seconds.


​

Time Capsule

11/23/2021

 
Picture
Making a Time Capsule

1. Decide on the purpose of your time capsule.
  •  Do you want to open this in 1 year, 5, years, 10 years   
  • Is this for goal setting or for looking back
2. Gather Items See the list of examples
  • · A letter to your future self
  • · Poem, quote, or lyrics
  • · Favorite recipe
  • · Photos
  • · Handmade item by you and/or a family member
  • · Business card from local businesses
  • · Ticket stubs
  • · Current magazines and/or newspapers
  • · Current Prices of things
  • · Goals/ Bucket List
  • · A recording of the news
  • · Sports trading cards
  • · List of slang terms
  • · Sample of product packaging
  • · A current postage stamp
  • · Coins/ money made from this year
  • · Year-in review sheet
  • · Have others write a letter to you. You will not be able to open until the date you picked. Parents, Grandparents, Sibling, friends, teacher, or someone special.
  • · Handprints and footprints
3.  Where are you going to store it?
  • Put in the attic, crawl space or basement. Place into garbage sack and tie it closed. This will help protect it.

​

Decorating Time Capsule

Supplies: Clean & Empty Paint Can, Mod Podge, foam brush, scissors,  and paper decorations

How to Decorate:
1. Print off and cut out pictures, sayings, clipart.
2.  Dip foam brush into the Mod podge and bush it onto the can. Place your decoration and mod podge over it.
3. Repeat until the can is covered and then let it dry.
4. Repeat covering the can 1 or 2 more times.
​Make sure to let dry in between coats.
 

Faux Cupcake Picture Frames or Not

11/19/2021

 
Picture
This activity was in the October 2021 Subscription Box: Trick or Treat. Make sure to hold the can of spray foam upside down. This will give you more controll over how much comes out. 

This activity, video, and photos came from A Kailo Chic Life. The video link will take you to the webpage and the how to video.


​

​
Supplies
Plastic Gloves
Plastic Table cloth or plastic drop cloth
Old clothes
Great Stuff  Gaps and Cracks,
Patch and Paint light weight spackling                          
Cupcake liners
Acrylic paint  for cupcake and frosting
Piping bag
​Paint Brush,
1M star piping tip (for crafting use ONLY, DON’T USE FOR FOOD afterwards)
​
(Optional) Paper Clip or a bent photo holder wire( you can buy one or make your own wire with a pair of pliers
 
Video Link:  https://akailochiclife.com/2018/07/diy-faux-cupcake-photo-holders.html
 
Instructions
1. When using Foam Sealant,  you need to wear gloves and old clothes that you don’t mind getting dirty. Needs to be done outside.

2. Foam sealant is used to stick to various surfaces and cover cracks. Put down a plastic sheet or something  down to prevent the foam from ruining the concrete    prior to spraying. Follow the directions on how to put the “straw” correctly onto the can.

3. Put cupcake liner in the cupcake tin.  See the picture on how to hold the can  like shown in the picture. LOW and STEADY pray the Great Stuff into the liners in a circular motion about half way full. As the foam cures, it will expand and create the perfect smooth domed cupcake top.

4. Leave the cupcakes to cure for 24 hours outside. Once fully cured you can sand the foam to remove the glossy layer and extra bumps to create a cake like smooth surface. Then use a bit of watered down golden brown to paint the tops for perfect cake look. Repeat with all of your cupcakes and let the paint dry.

5. While the paint is drying mix your “icing” for this you will use acrylic paint to tint the light weight spackle. Just mix the paint into the spackle until well incorporated and then fill a piping bag with the mixture.

6. Pipe the “icing” onto the cupcakes in any pattern you like.  The pictures show a traditional swirl. 

7. Let the “icing” dry overnight. I wanted a more vibrant cupcake wrapper, so I used a paint brush to paint the wrappers with acrylic paint.
​
8. To turn them into photo holders, simply insert a bend wire piece into the top of the cupcake and down into the foam “cake” base.


Giant Faux Popcorn

11/12/2021

 
Picture


 The Giant Faux Popcorn  was an activity in the October 2021 Young Adult Subscription Box: Trick or Treat?. The idea was found on the on the SITS Girls Blog from Decmeber of 2019 Giant Faux Garland. The video link below came from the blog and will take you directly to it. The photos used are also from the blog to show what more than one will look like. I exerpeminated with one, to make sure it worked, and  now my family wants to make more.  MML would love to see a picture of your finished project. 

Giant Popcorn

Supplies

Plastic  gloves, Plastic Table Cloth/ Drop Cloth
Newspaper, Insulating Foam Sealant
String, Kabob skewer or Chopsticks, Tape
Red Ornament Balls—looks like cranberries (optional)

Video Link

Instructions
1. When using Foam Sealant,  you need to wear gloves and old clothes that you don’t mind getting dirty. Needs to be done outside, but out of the wind.

2. Foam sealant is used to stick to various surfaces and cover cracks. Put down a plastic sheet or something  down to prevent the foam from ruining the concrete prior to spraying.

3. Roughly  ball  the news paper up. It  does not have to be perfect– this is basically a base to hold the shape of the popcorn. If you want super huge popcorn kernels, make the newspaper ball larger.

4. Attach the spray straw of the foam can. Shake the foam can and then begin to spray directly on the balled up newspaper.

5. Cover the newspaper entirely and then add a few nice big plops to the sides to make it look like popcorn.

6. Let the foam dry completely. It takes about an hour or two depending on how hot it is outside. Once it is dry, it will easily peel off of the plastic drop cloth. Flip it over and cover the other side of the newspaper. Let it dry again before moving it.

7. Once both sides are dry, you can add some more peaks to your popcorn if you want.

8. Tape your string to the end of the Chopstick. Take chopstick and making a hole to string each piece of “popcorn”. Then thread string through one side and out the other, and repeat the process until you have your popcorn strung.

Optional  If you want to add a little color to the garland, you can purchase cheap plastic red ornaments to look like cranberries or different  brightly colored ornaments to look like  candy.

To hang  Attach a couple of command hooks to gutters and string them up. The beauty of the foam popcorn kernels is that they are waterproof, light, and durable in all sorts of weather.

Variation:  You can make regular sized fake popcorn and string it with a needle and thread. For berries red beads or fake cranberries  can be strung as well.


Young Adult Subscription Boxes

11/9/2021

 
Did you miss a Young Adult Subscription Box? You will be able to find past Young Adult Subscription Box activities on this blog. Each entry will give when the box was released and activity instructions. Any 4th-12th grader wanting to register for current Subscription Boxes can call 712-338-4643 or go to our Young Adult Subscription Box Registration. 
Picture

    Author

    Milford Library Staff

    Archives

    February 2023
    January 2023
    April 2022
    February 2022
    November 2021
    June 2018
    March 2018
    May 2017
    March 2017
    January 2017
    June 2016
    November 2015
    October 2015
    September 2015
    July 2015
    June 2015
    May 2015
    April 2015
    March 2015
    February 2015
    January 2015
    December 2014
    November 2014
    October 2014
    September 2014
    June 2013
    February 2013

    RSS Feed

Powered by Create your own unique website with customizable templates.