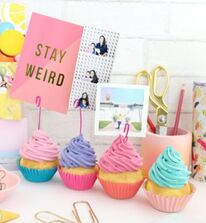
This activity was in the October 2021 Subscription Box: Trick or Treat. Make sure to hold the can of spray foam upside down. This will give you more controll over how much comes out.
This activity, video, and photos came from A Kailo Chic Life. The video link will take you to the webpage and the how to video.
Supplies
Plastic Gloves
Plastic Table cloth or plastic drop cloth
Old clothes
Great Stuff Gaps and Cracks,
Patch and Paint light weight spackling
Cupcake liners
Acrylic paint for cupcake and frosting
Piping bag
Paint Brush,
1M star piping tip (for crafting use ONLY, DON’T USE FOR FOOD afterwards)
(Optional) Paper Clip or a bent photo holder wire( you can buy one or make your own wire with a pair of pliers
Video Link: https://akailochiclife.com/2018/07/diy-faux-cupcake-photo-holders.html
Instructions
1. When using Foam Sealant, you need to wear gloves and old clothes that you don’t mind getting dirty. Needs to be done outside.
2. Foam sealant is used to stick to various surfaces and cover cracks. Put down a plastic sheet or something down to prevent the foam from ruining the concrete prior to spraying. Follow the directions on how to put the “straw” correctly onto the can.
3. Put cupcake liner in the cupcake tin. See the picture on how to hold the can like shown in the picture. LOW and STEADY pray the Great Stuff into the liners in a circular motion about half way full. As the foam cures, it will expand and create the perfect smooth domed cupcake top.
4. Leave the cupcakes to cure for 24 hours outside. Once fully cured you can sand the foam to remove the glossy layer and extra bumps to create a cake like smooth surface. Then use a bit of watered down golden brown to paint the tops for perfect cake look. Repeat with all of your cupcakes and let the paint dry.
5. While the paint is drying mix your “icing” for this you will use acrylic paint to tint the light weight spackle. Just mix the paint into the spackle until well incorporated and then fill a piping bag with the mixture.
6. Pipe the “icing” onto the cupcakes in any pattern you like. The pictures show a traditional swirl.
7. Let the “icing” dry overnight. I wanted a more vibrant cupcake wrapper, so I used a paint brush to paint the wrappers with acrylic paint.
8. To turn them into photo holders, simply insert a bend wire piece into the top of the cupcake and down into the foam “cake” base.

 RSS Feed
